
Install Your Own Wine Cooler In 7 Easy Steps
Do you keep wishing you could store your wine collection at the proper temperature, but you just don’t know where you’d put a whole new freestanding appliance?
It’s hard to balance the need for a beverage center with the fact that you’d have to give up precious floor space in your home. Undercounter wine coolers solve the problem by fitting into small spaces, keeping your wine close at hand when you’re serving guests.
Depending on your personal style and available space, you can find a built-in wine cooler in just the right size. Small wine fridges will store up to 19 bottles, while larger under-counter coolers have room for up to 116 bottles. You can choose your setting from a wide temperature range or set two different temperatures for the two zones of the fridge.
When you install a wine cooler under your existing countertop, you add new graciousness to your hosting, without changing the traffic patterns of your home. You no longer have to remember to chill white wine the right number of hours ahead of time or try to find a storage spot for your red wine that’s not too hot or cold. If someone gifts you with a very special bottle of wine, you don’t have to worry about putting it somewhere that you know is not the optimum temperature. Furthermore, a built-in compressor wine cooler brings a contemporary flare to your real estate investment, adding value beyond the price of the appliance.
An Overview of Wine Cooler Installation
Installing a beverage fridge in an existing cabinet is a DIY project that doesn’t require mad carpentry skills. Depending on the configuration of your cabinets, you may be able to handle the whole job yourself. All you need to know are a few basics, and you’ll be surprised at how easy the installation actually is. The first step is a fun one: picking out the model that you want.
Step 1: Choose the Right Wine Fridge

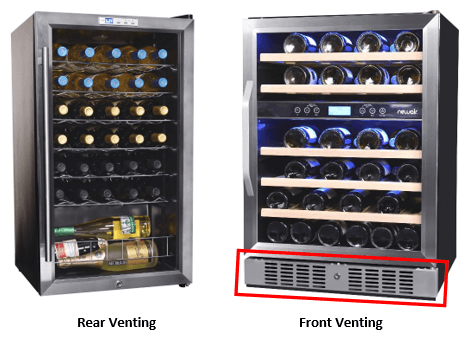
If you’re planning to install your wine cooler under a countertop, you must find a model that states it is usable as a built-in. The reason is that these wine chillers have grills in front to vent the warm air produced by the compressor. Thermoelectric wine fridges need more air circulating around them and are not appropriate for installing underneath a countertop. Compressor coolers are also more efficient: Unlike thermoelectric fridges, which can only cool to about 20 degrees Fahrenheit below the ambient room temperature, compressor coolers can easily maintain whatever temperature you choose. The compressors in NewAir’s wine coolers all use modern refrigerants, which don’t harm the earth’s ozone layer. Depending on the type of wine storage you need, you will want to choose between single and dual zone wine coolers. Whichever model you pick, you won’t have to budget for any shipping costs — NewAir offers free shipping on all its wine refrigerators.
Of course, the major factor you have to keep in mind when deciding on built-in wine coolers or built in beverage fridges, is how much space you have in your existing cabinetry. It’s time to get out your tape measure and start thinking creatively about where your new cooler might be able to fit!
Step 2: Pick the Most Practical Location
Many people prefer to store wine in their kitchen because that’s where you naturally keep all your food and drink. Perhaps you have a kitchen island that you could extend or a kitchen cabinet that never really gets used. However, you may have more placement options than you realize. A wine cooler doesn’t need a water source, so it can go anywhere in your house. Where do you do the most entertaining? If your living room already has some shelving or a home bar, then your wine chiller fridge may easily fit underneath an existing countertop there. Dining rooms are also great places to have a few bottles close at hand, under a bar or in a cabinet that already functions as a serving area. If you currently have a simple wine rack, you may be able to simply replace it with a beverage fridge. In some very compact home spaces, the area under the stairs is becoming popular as a spot for wine refrigerators.

Replace a Trash Compactor
Kitchen trends change, and the consensus seems to be that trash compactors are declining in popularity. The space left by removing a trash compactor that you don’t use could work out just about right for one of the narrower wine cooler models.
Replacing Counters? It’s the Perfect Time to Add a Wine Cooler
You can add a wine cooler under the end of the existing counter and design your new counter surface to extend over the wine cooler. It’s good to remember that many wine refrigerators come with the hardware needed to let the door swing in either direction.
Installing a Wine Cooler in an Existing Cabinet
Another option to consider is whether you have any current cabinet space that you don’t often use. Do you have a whole cupboard dedicated to storing large items (turkey roasting pans, electric ice cream makers, etc.) that you only use once or twice a year? Consider moving these things to elsewhere in your house and using the prime kitchen space for a wine fridge. It’s not hard to remove a cabinet door and even the floor of the cabinet itself.
Regardless of which location you pick, you have to keep in mind the following three factors:
- Temperature: Don’t make your cooler work overtime by installing it next to an oven or dishwasher.
- Light: Most wine refrigerators come with glass doors that protect against some ultraviolet rays, but it’s still a good idea to avoid harsh lights or direct sunlight. Ultraviolet light is not good for wine, and many sources of bright light also carry additional warmth.
- Ventilation: You can’t squeeze a wine cooler into a space that it just barely fits in. The cooling mechanism can’t work properly unless it has the right amount of air space above, behind and on the sides. To allow for the necessary airflow, your wine cooler needs 2 inches of extra space in back, 4 inches on top and 1 inch on either side. Because of this need for ventilation, it’s not possible to hide your wine cooler behind a cabinet door.
You also need to be aware of how and where the doors open. In order to slide out a rack or shelf from the fridge, you’ll need the door to be able to swing open freely.
Step 3: Check Your Power Supply
Where will you plug in your wine cooler? If you don’t have an electrical outlet immediately handy, you may want to call an electrician and have a new one installed. Most appliance manufacturers discourage the use of extension cords. Your outlet needs a ground protection for safety, and it’s important to keep the cord out of the way, where it won’t get moved or tripped over. You can drill a small hole in the back of your cabinet to fit the cord through. Some contractors are able to do electrical work as well as cabinetry, so if you need some help with revising the existing cabinet you may find one person who can handle both jobs.

Step 4: Gather Tools and Materials
Learning how to install a wine cooler undercounter won’t be a lengthy process. You don’t need anything very specialized — this is definitely an accessible DIY project if you already have an undercounter space large enough for your wine fridge. You’ll definitely want to have the following items near at hand:
- Tape measure
- Level
- The manual for your model of wine cooler. This will give you the exact instructions about ventilation needs and other details for setting everything up.
You might also need:
- Phillips head screwdriver (for installing the handle, if it was packed separately
- Scrap wood to use as shims under the feet, if the floor surface is very uneven. Most wine coolers come with adjustable feet, so that small variations in level can be dealt with.
- Tray or sheet of plastic if the installation floor area is carpeted.

Step 5: Prepare the Space
In addition to making sure your undercounter space is big enough for your wine cooler, you need to consider the floor surface. If the floor is carpeted, it’s a good idea to cover the carpeted area with some type of plastic or metal tray. While it’s rare for any freezer to leak, there may be some “sweating” or condensation. The last thing you’d want would be for mold to grow beneath your cooler. Furthermore, carpet can hold in the heat generated by the condenser, rather than letting it dissipate. This is true for regular large refrigerators as well; they should never be installed on a carpeted surface.
Step 6: Be Patient for Two Hours
Once your wine fridge is in place and leveled, don’t plug it in right away. You will need to let it stand for at least two hours before attaching it to a power source, so that the coolant can settle after transport. Turning it on too soon can result in problems with its operation.
Step 7: Enjoy Your New Wine Cooler
Now you can serve perfect-temperature wine as if you had plucked the bottle from your own wine cellar.
0 comments